

Nginx编译动态模块nginx-module-vts
目录
最近想要统计监控 nginx 的流量状态,发现了一个功能强大的模块 nginx-module-vts,然而它并不是官方模块,需要自己手动编译。一番了解后发现 nginx 支持动态模块,可以在添加第三方模块时不用重新编译nginx。
背景
Nginx 在1.11.5版本中添加了对动态模块的支持,它采用模块化的方式,可以在 Nginx 运行时增加特定的功能,包括第三方开发的新特性。
模块采用C语言开发,它通过特定的API接口来扩展 nginx 的功能。
对于第三方模块或者我们自己开发的模块,可以独立进行编译,然后在 Nginx 运行时直接加载。对于已经稳定运行或通过 apt 安装的 Nginx,我们可能并不想因为需要某个功能而重新编译整个 nginx,这时候通过动态模块的方式就非常符合我们的需求了。
准备
编译动态模块,主要分为以下几个步骤:
- 获取 nginx 源码;
- 获取模块源码;
- 编译模块;
- 加载模块(.so文件);
为了保证编译出来的动态模块能正常使用,源码需要与当前运行的Nginx版本相匹配:
$ nginx -v
nginx version: nginx/1.18.0 (Ubuntu)
$ wget https://nginx.org/download/nginx-1.18.0.tar.gz
$ tar -zxvf nginx-1.18.0.tar.gz
再从 github 下载 nginx-module-vts 模块的源码:
$ git clone https://github.com/vozlt/nginx-module-vts.git目录结构:
$ ls -al
drwxr-xr-x  9 ubuntu ubuntu      4096 Sep 24 13:25 nginx-1.18.0/
drwxrwxr-x  9 ubuntu ubuntu      4096 Sep 24 13:12 nginx-module-vts/
编译
由于我们当前的 nginx 是通过 apt 安装的,编译动态模块时需要保证 configure 参数与 nginx 编译时一致:
$ nginx -V
nginx version: nginx/1.18.0 (Ubuntu)
built with OpenSSL 3.0.2 15 Mar 2022
TLS SNI support enabled
configure arguments: --with-cc-opt='-g -O2 -ffile-prefix-map=/build/nginx-9P0wNJ/nginx-1.18.0=. -flto=auto -ffat-lto-objects -flto=auto -ffat-lto-objects -fstack-protector-strong -Wformat -Werror=format-security -fPIC -Wdate-time -D_FORTIFY_SOURCE=2' --with-ld-opt='-Wl,-Bsymbolic-functions -flto=auto -ffat-lto-objects -flto=auto -Wl,-z,relro -Wl,-z,now -fPIC' --prefix=/usr/share/nginx --conf-path=/etc/nginx/nginx.conf --http-log-path=/var/log/nginx/access.log --error-log-path=/var/log/nginx/error.log --lock-path=/var/lock/nginx.lock --pid-path=/run/nginx.pid --modules-path=/usr/lib/nginx/modules --http-client-body-temp-path=/var/lib/nginx/body --http-fastcgi-temp-path=/var/lib/nginx/fastcgi --http-proxy-temp-path=/var/lib/nginx/proxy --http-scgi-temp-path=/var/lib/nginx/scgi --http-uwsgi-temp-path=/var/lib/nginx/uwsgi --with-compat --with-debug --with-pcre-jit --with-http_ssl_module --with-http_stub_status_module --with-http_realip_module --with-http_auth_request_module --with-http_v2_module --with-http_dav_module --with-http_slice_module --with-threads --add-dynamic-module=/build/nginx-9P0wNJ/nginx-1.18.0/debian/modules/http-geoip2 --with-http_addition_module --with-http_gunzip_module --with-http_gzip_static_module --with-http_sub_module
参考上面的参数,可以发现其中有 --add-dynamic-module,同样使用该参数 --add-dynamic-module=../nginx-module-vts 就可以编译动态模块了:
$ ./configure --with-cc-opt='-g -O2 -ffile-prefix-map=/build/nginx-9P0wNJ/nginx-1.18.0=. -flto=auto -ffat-lto-objects -flto=auto -ffat-lto-objects -fstack-protector-strong -Wformat -Werror=format-security -fPIC -Wdate-time -D_FORTIFY_SOURCE=2' --with-ld-opt='-Wl,-Bsymbolic-functions -flto=auto -ffat-lto-objects -flto=auto -Wl,-z,relro -Wl,-z,now -fPIC' --prefix=/usr/share/nginx --conf-path=/etc/nginx/nginx.conf --http-log-path=/var/log/nginx/access.log --error-log-path=/var/log/nginx/error.log --lock-path=/var/lock/nginx.lock --pid-path=/run/nginx.pid --modules-path=/usr/lib/nginx/modules --http-client-body-temp-path=/var/lib/nginx/body --http-fastcgi-temp-path=/var/lib/nginx/fastcgi --http-proxy-temp-path=/var/lib/nginx/proxy --http-scgi-temp-path=/var/lib/nginx/scgi --http-uwsgi-temp-path=/var/lib/nginx/uwsgi --with-compat --with-debug --with-pcre-jit --with-http_ssl_module --with-http_stub_status_module --with-http_realip_module --with-http_auth_request_module --with-http_v2_module --with-http_dav_module --with-http_slice_module --with-threads --with-http_addition_module --with-http_gunzip_module --with-http_gzip_static_module --with-http_sub_module --add-dynamic-module=../nginx-module-vts如果提示缺少依赖库,则只需要对应安装即可:
./configure: error: the HTTP rewrite module requires the PCRE library.
./configure: error: SSL modules require the OpenSSL library.

$ sudo apt install libpcre3-dev
$ sudo apt install libssl-dev
配置完成:
Configuration summary
  + using threads
  + using system PCRE library
  + using system OpenSSL library
  + using system zlib library

  nginx path prefix: "/usr/share/nginx"
  nginx binary file: "/usr/share/nginx/sbin/nginx"
  nginx modules path: "/usr/lib/nginx/modules"
  nginx configuration prefix: "/etc/nginx"
  nginx configuration file: "/etc/nginx/nginx.conf"
  nginx pid file: "/run/nginx.pid"
  nginx error log file: "/var/log/nginx/error.log"
  nginx http access log file: "/var/log/nginx/access.log"
  nginx http client request body temporary files: "/var/lib/nginx/body"
  nginx http proxy temporary files: "/var/lib/nginx/proxy"
  nginx http fastcgi temporary files: "/var/lib/nginx/fastcgi"
  nginx http uwsgi temporary files: "/var/lib/nginx/uwsgi"
  nginx http scgi temporary files: "/var/lib/nginx/scgi"
编译动态模块,完成后在 objs 目录下生成模块的 so 文件:
$ make modules
$ ls -al objs/
-rwxrwxr-x 1 ubuntu ubuntu 717512 Sep 24 13:40 ngx_http_vhost_traffic_status_module.so
安装
顺利编译出对应的动态模块后,我们就可以把它加载到 nginx 中了。
先看一下已经加载的动态模块:
$ ls -al /etc/nginx/modules-enabled/
total 16
drwxr-xr-x 2 root root 4096 Jul 17 00:19 .
drwxr-xr-x 8 root root 4096 Jul 17 00:07 ..
lrwxrwxrwx 1 root root   59 Jul 17 00:19 50-mod-http-fancyindex.conf -> /usr/share/nginx/modules-available/mod-http-fancyindex.conf
lrwxrwxrwx 1 root root   55 Jul 16 22:56 50-mod-http-geoip2.conf -> /usr/share/nginx/modules-available/mod-http-geoip2.conf
lrwxrwxrwx 1 root root   61 Jul 16 22:56 50-mod-http-image-filter.conf -> /usr/share/nginx/modules-available/mod-http-image-filter.conf
lrwxrwxrwx 1 root root   60 Jul 16 22:56 50-mod-http-xslt-filter.conf -> /usr/share/nginx/modules-available/mod-http-xslt-filter.conf
lrwxrwxrwx 1 root root   48 Jul 16 22:56 50-mod-mail.conf -> /usr/share/nginx/modules-available/mod-mail.conf
lrwxrwxrwx 1 root root   50 Jul 16 22:56 50-mod-stream.conf -> /usr/share/nginx/modules-available/mod-stream.conf
lrwxrwxrwx 1 root root   57 Jul 16 22:56 70-mod-stream-geoip2.conf -> /usr/share/nginx/modules-available/mod-stream-geoip2.conf

$ cat /usr/share/nginx/modules-available/mod-http-fancyindex.conf
load_module modules/ngx_http_fancyindex_module.so;
在前面的配置,nginx 动态模块的路径是 /usr/lib/nginx/modules,我们把 ngx_http_vhost_traffic_status_module.so 也复制进去,然后添加一个配置文件:
$ sudo cp objs/ngx_http_vhost_traffic_status_module.so /usr/lib/nginx/modules/
$ sudo vim /etc/nginx/modules-enabled/mod-http_vhost_traffic_status.conf
load_module modules/ngx_http_vhost_traffic_status_module.so;
修改 nginx.conf 配置,在 http 块添加 vhost_traffic_status_zone,在 server 块添加:
http {
       vhost_traffic_status_zone;
}

server {
       location /status {
                vhost_traffic_status_bypass_limit on;
                vhost_traffic_status_bypass_stats on;
                vhost_traffic_status_display;
                vhost_traffic_status_display_format html;
        }
}
vhost_traffic_status 相关的配置参数可以参考项目文档说明。
最后 reload 一下 nginx:
$ sudo nginx -t
nginx: the configuration file /etc/nginx/nginx.conf syntax is ok
nginx: configuration file /etc/nginx/nginx.conf test is successful
$ sudo nginx -s reload
效果
浏览器访问 /status ,可以看到nginx相关统计数据:
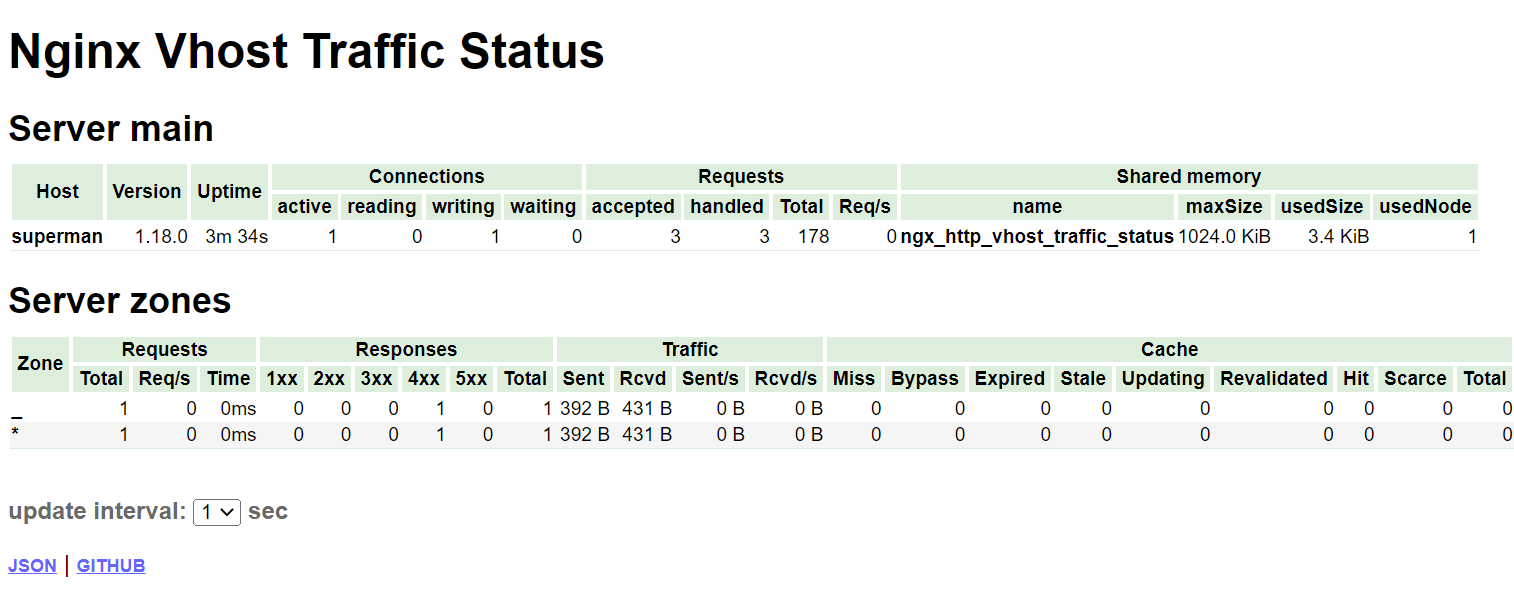
此外,还可以获取特定格式的数据,比如Prometheus: /status/format/prometheus。
参考:
- https://github.com/vozlt/nginx-module-vts
- Nginx虚拟主机流量状态模块(nginx-module-vts)
- Compiling Third-Party Dynamic Modules for NGINX
评论