

ownCloud——搭建自己的云空间
目录
这两天在使用enpass发现一个很大的问题,数据同步。使用Google disk,国内原因太麻烦放弃了;使用dropbox之类的国外网盘,发现每同步一次都要好久。遂决定搭建一个自己的云空间,选择ownCloud,刚好还支持webDAV……
安装
下载源码压缩包:
$ wget https://download.owncloud.org/community/owncloud-9.0.0.zip
$ wget https://download.owncloud.org/community/owncloud-9.0.0.zip.md5
# 校验
$ md5sum owncloud-9.0.0.zip.md5
系统要求:
- MySQL/MariaDB
- PHP 5.4 +
- Apache / Nginx
在这里我们选择 PHP + MySQL + Nginx,在MySQL中新建一个数据库owncloud,解压源码:
$ unzip owncloud-9.0.0.zip
# 链接到 nginx web 目录
$ sudo ln -sv /path/to/owncloud /var/www
设置 owncloud 文件权限,执行下面的脚本,自动修改好文件权限:
#!/bin/bash
ocpath='/var/www/owncloud'
htuser='www-data'
htgroup='www-data'
rootuser='root'

printf "Creating possible missing Directories\n"
mkdir -p $ocpath/data
mkdir -p $ocpath/assets

printf "chmod Files and Directories\n"
find ${ocpath}/ -type f -print0 | xargs -0 chmod 0640
find ${ocpath}/ -type d -print0 | xargs -0 chmod 0750

printf "chown Directories\n"
chown -R ${rootuser}:${htgroup} ${ocpath}/
chown -R ${htuser}:${htgroup} ${ocpath}/apps/
chown -R ${htuser}:${htgroup} ${ocpath}/config/
chown -R ${htuser}:${htgroup} ${ocpath}/data/
chown -R ${htuser}:${htgroup} ${ocpath}/themes/
chown -R ${htuser}:${htgroup} ${ocpath}/assets/

chmod +x ${ocpath}/occ

printf "chmod/chown .htaccess\n"
if [ -f ${ocpath}/.htaccess ]
 then
  chmod 0644 ${ocpath}/.htaccess
  chown ${rootuser}:${htgroup} ${ocpath}/.htaccess
fi
if [ -f ${ocpath}/data/.htaccess ]
 then
  chmod 0644 ${ocpath}/data/.htaccess
  chown ${rootuser}:${htgroup} ${ocpath}/data/.htaccess
fi
配置 Nginx, 添加 /etc/nginx/sites-enabled/owncloud:
# ownCloud
server {
	listen 80;
	root /var/www/owncloud;
	server_name cloud.chenjiehua.me;

	access_log /home/ubuntu/log/nginx/owncloud.log main;

	# Add headers to serve security related headers
	add_header Strict-Transport-Security "max-age=15768000; includeSubDomains; preload;";
	add_header X-Content-Type-Options nosniff;
	add_header X-Frame-Options "SAMEORIGIN";
	add_header X-XSS-Protection "1; mode=block";
	add_header X-Robots-Tag none;
	add_header X-Download-Options noopen;
	add_header X-Permitted-Cross-Domain-Policies none;

	# set max upload size
	client_max_body_size 1G;
	fastcgi_buffers 64 4K;

	# Disable gzip to avoid the removal of the ETag header
	gzip off;

	index index.php;
	error_page 403 /core/templates/403.php;
	error_page 404 /core/templates/404.php;

	rewrite ^/.well-known/carddav /remote.php/dav/ permanent;
	rewrite ^/.well-known/caldav /remote.php/dav/ permanent;

	location = /robots.txt {
		allow all;
		log_not_found off;
		access_log off;
	}

	location ~ ^/(build|tests|config|lib|3rdparty|templates|data)/ {
		deny all;
	}

	location ~ ^/(?:\.|autotest|occ|issue|indie|db_|console) {
		deny all;
	}

	location / {
		rewrite ^/remote/(.*) /remote.php last;
		rewrite ^(/core/doc/[^\/]+/)$ $1/index.html;
		try_files $uri $uri/ =404;
	}

	location ~ \.php(?:$|/) {
		fastcgi_split_path_info ^(.+\.php)(/.+)$;
		fastcgi_pass unix:/var/run/php5-fpm.sock;
		include fastcgi_params;
		fastcgi_param SCRIPT_FILENAME $document_root$fastcgi_script_name;
		fastcgi_param PATH_INFO $fastcgi_path_info;
		# fastcgi_param HTTPS on;
		fastcgi_param modHeadersAvailable true; #Avoid sending the security headers twice
		fastcgi_intercept_errors on;
	}

	# Adding the cache control header for js and css files
	# Make sure it is BELOW the location ~ \.php(?:$|/) { block
	location ~* \.(?:css|js)$ {
		add_header Cache-Control "public, max-age=7200";
		# Add headers to serve security related headers
		add_header Strict-Transport-Security "max-age=15768000; includeSubDomains; preload;";
		add_header X-Content-Type-Options nosniff;
		add_header X-Frame-Options "SAMEORIGIN";
		add_header X-XSS-Protection "1; mode=block";
		add_header X-Robots-Tag none;
		add_header X-Download-Options noopen;
		add_header X-Permitted-Cross-Domain-Policies none;
		# Optional: Don't log access to assets
		access_log off;
	}

	# Optional: Don't log access to other assets
	location ~* \.(?:jpg|jpeg|gif|bmp|ico|png|swf)$ {
		access_log off;
	}
}
然后重启nginx,从浏览器访问,开始配置数据库和初始化:
$ sudo nginx -s reload
配置
配置需要php安装相应的模块
邮件配置
修改配置文件,/var/www/owncloud/config/config.php:
'mail_smtpmode' => 'smtp',
'mail_from_address' => 'cloud',
'mail_domain' => 'chenjiehua.me',
'mail_smtphost' => 'localhost',
'mail_smtpport' => '25',
缓存配置
这里的缓存也可以选择memcached,我们以redis为例:
'memcache.local' => '\\OC\\Memcache\\APCu',
'memcache.locking' => '\\OC\\Memcache\\Redis',
'redis' =>
   array (
     'host' => 'localhost',
     'port' => 6379,
   ),
LDAP配置
以管理员登陆owncloud,点击右上角添加其他“应用”,找到 LDAP user and group backend;如果安装不成功,也可以直接到官方下载相应的app源码,然后上传到 /var/www/owncloud/apps/目录。
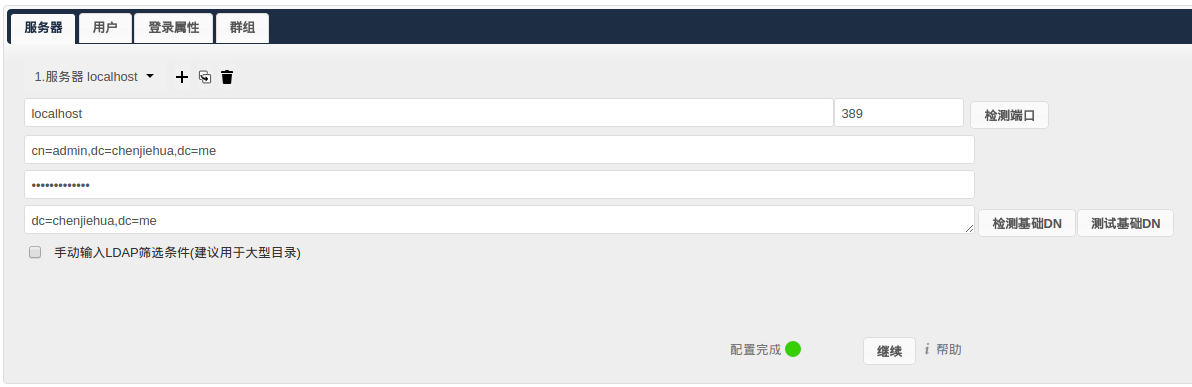
用户 选项卡:
↓ 编辑LDAP查询
(memberOf=cn=owncloud,ou=groups,dc=chenjiehua,dc=me)
登陆属性 选项卡:
↓ 编辑LDAP查询
(&(memberOf=cn=owncloud,ou=groups,dc=chenjiehua,dc=me)(uid=%uid))
高级 选项卡:
#设置 特殊属性-电邮字段
>  mail
客户端
参考 Get Started 步骤2,下载相应平台的客户端。
码字很辛苦,转载请注明来自ChenJiehua的《ownCloud——搭建自己的云空间》
评论